Its Fleece Electrostatic
6
Make sure HD is on, and if possible full-screen. It makes a difference.
Here it is on vimeo too.
5
Mauricio Pauly asked me to make the videos for two of his works. I thank him for his trust and belief in me, because as we excitedly talked the project over at one of his favorite in-town coffee shops, he didn’t at all hesitate when I requested I be able to approach this however I wanted.
This first piece, Its Fleece Electrostatic, is for violin, and it’s Linda Jankowska’s performance(s) edited together in this video, which I shot over a few hours on a Wednesday in early July of 2014. What follows is how I manipulated that footage over the next several months.
4
[In this section, I’ve tried to detail some of the technical specifics regarding the making of this video. They are the methods I cobbled together from hours of research on the internet, as well as some tid-bits from some of my excellent programmer friends. (As far as I know there isn’t a more cohesive guide. If there is PLEASE share it with me!) So now that I’ve done the leg work, I want to pass it all along so it’s easier for others to explore video making in this way. Hopefully what follows can help you in some way.
This is the first video where I really dig into datamoshing.
I had been drawn to it for some time, but felt like it was this very mysterious thing just out of reach, just outside the realm of my understanding and technical ability. Some years prior I had found a tutorial on youtube (How To Datamosh by datamosher) and while the process shown is effective and educational, I also found it prohibitively tedious. Oh my god(!) how I could not handle having to set in and out points to manually delete every “I” frame in a length of video using the un-sexiest programs, and then having to convert files back and forth just to see what I had made.
There are I frames and there are P frames. I frames are a keyframe or an image whose pixels are referrenced. P frames are frames where the data just refers to the motion of the pixels in the I frames. Datamosher’s youtube videos do a good job of showing you this stuff. So I dropped it and went on to something else. That something else was working on these specific kinds of process drawings. Here’s an example (there are other posts about them).
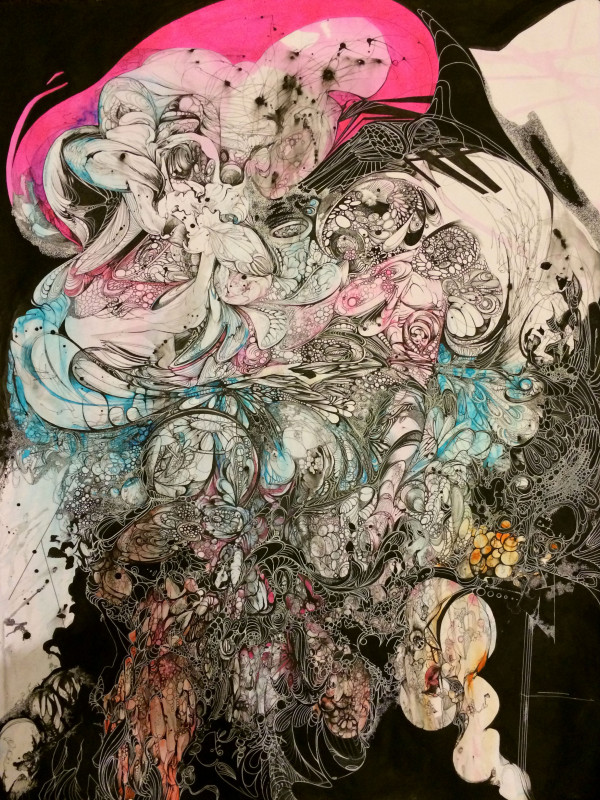 Above: a strong sense of the pattern (all the colors of sex)
owned by Linda Jankowska
The time spent making these drawings acclimated me to a certain attitude about process, that I think can be misinterpretted, but best understood, as patience.
Over the time that I was making these drawings, I also saw two videos which inspired me greatly.
They are:
Welcome To Heartbreak by Kanye West (for it’s use of datamoshing) and
Body & Blood by Clipping (for it’s use of greenscreen).
Damn it! If I had to do some tedious shit to datamosh, so be it. Welcome To Heartbreak is just too cool.
So I revisited the idea of datamoshing and after having done some research I came across another way to datamosh using a program called GoldmoshLive. It is basically a Max patch that you feed a length of video into, and it fucks it up in some way. The program gives you some options, but they don’t work as described, and what they do do really isn’t that great anyway. Datamoshing means things aren’t going to work the way they should anyway.
Synopsis: Something goes in…something, something…Ding! Something fucked up comes out. However, the things you feed into Goldmosh greatly impact what comes, out and the correlations are largely unpredictable. Every adjustment of parameter altered the outcome greatly: opacity, color choices, layers, re-timing of clips, treatment of each layer, keying, filters, clip length etc. But this was a good thing! It encouraged experimentation. And through this experimentation I learned how to ride the digital dragon!
Fair warning: If your computer is anything like mine, Goldmosh is going to crash it when you first open the application. That’s ok. I think you should probably get used to things crashing or going wrong. This whole thing is a controlled fall. So once you’ve restarted your computer you’ll be able to open Goldmosh by right clicking and selecting open. Double clicking to open won’t open it. Your computer is trying to protect itself. You should make a duplicate of the video you want to “goldmosh” because it’s going to replace your file with the goldmoshed version. Note: You can goldmosh mp4 files. They don’t have to be avi. BUT they CAN’T be 1080HD. They have to be 720 resolution or less. Them’s the breaks. If you try to feed it a 1080HD video nothing will happen.
So from this point the central mechanisms for building fleece were the processes of experimentation and selection.
Early into the process I discovered Final Cut Pro X couldn’t handle playing a timeline with too many of these Goldmoshed (ie corrupted) clips. In fact, one night while I was knee deep, and had really found a good groove with it all, I imported one corrupted clip too many and POOF! A BIG CRASH.
When I was finally able to reopen Final Cut, it decided it wasn’t going to recognize the project file at all anymore. I had basically lost all my effort up to that point. Everything I had constructed across several timelines was gone. I didn’t know losing my work was a possibility and it was a good month’s worth of work up to that point.
In the end, I lost everything I had built, but salvaged the initial footage that I had shot of Linda in front of the green screen (I really thought I had lost that too and felt absolutely terrible. Feeling as if you wasted someone else’s time is not a good feeling). I didn’t return to the project for a few months because I felt disheartened. Welcome to Heartbreak.
But I had learned some things through all the experimentation I had done. The crash couldn’t wipe that!
When I started up again, I worked only seconds of footage at a time to minimize the risk of another bad crash. What I think finally midigated some of the risk of crashing was that I would take the goldmoshed clips, import them into final cut, and then re-export them. I like to think that this somehow “cooks” the clips. It makes the unstable data stay put. It stabilizes the clip. This adds an extra step, but it’s necessary since it mitigates the risk of losing everything.
So I would work on these micro-sections of the piece, trying to make meaningful decisions about what the creation/selection of what those chunks were. I was dividing the piece into little, little pieces.
On average building 10 seconds of footage took me 3-4 days. Nothing in the video is automated…or automatically mapped. The decisions are mine. What I mean is, there are no decision-making algorithms at play. I did not give a program the specification that every time you hear a F# for instance, that the screen goes blue.
While I tried to give each moment in the piece unique consideration, I’ll try to give a very general over-view. These considerations are not sequential and would be repeated throughout
+ Figure out which clips to include and which work well together as layers. Linda and I filmed for the good part of a day so I had a fair share of takes, both of individual sections and some full run-throughs.
+ Think about MOTION and COLOR
+ Consider re-timing sections (slow-motion, speed ramping, f-fwd). Was it appropriate or not? What kind of things should do, so they make sense in the context of the piece?
+ Make decisions about color. Really, broad strokes stuff. I’d add layers that would normally not be seen, but datamoshing fucks things up in unexpected ways so I’d add opaque layers on top of opaque layers and experiment with the treatment of each layer (multiply vs lighten vs overlay etc) just to see what would happen. And yes, it changes things. I can think of this stuff in terms of painting, and this is the big brush work. The broad strokes.
+ Then datamosh the shit out of that stuff. In my case using Ruby scripts or Goldmosh. Changing things so different things happen, and then choosing the things I’d feed back into the timeline to then re-export and continue this experimentation, until I felt satisfied with the section. “I’ll know it when I see it.”
And again, each time something got moshed and reimported it felt like I was “cooking” them, flattening things down. I don’t mean as in making them less complex. I mean as in baking them in.
Rodrigo mentioned that a good parallel might be how Aphex Twin constructs his music. I fucking love Aphex Twin.
Going back to what I was saying about corrupted Goldmoshed clips:
The first time you import a freshly Goldmoshed clip back into Final Cut it is suuuuuuper corrupted. Sometimes this can look quite cool when you play it back–but it won’t behave unpredictably across several viewings. I think Final Cut plays/processes that section of video anew each time it drags the playhead across that clip in the timeline.
Before clips are “locked in”, They begin as layered video clips, but once it’s exported only one clip is made, and THAT is what’s Goldmoshed. Since I reimport an exported Goldmoshed clip, I delete the layers it came from. It is a destructive process. Though I did work in alternate project files in order to keep some experiments in tact.
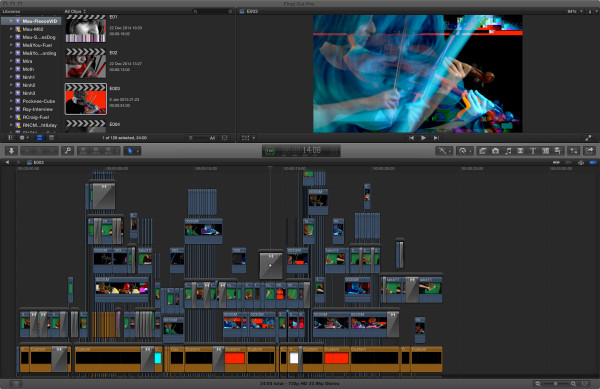
Here are a few screen shots of my timelines (even with sections already flattened–cooked–you can see the beautiful layer-braid-sausage-stacks): 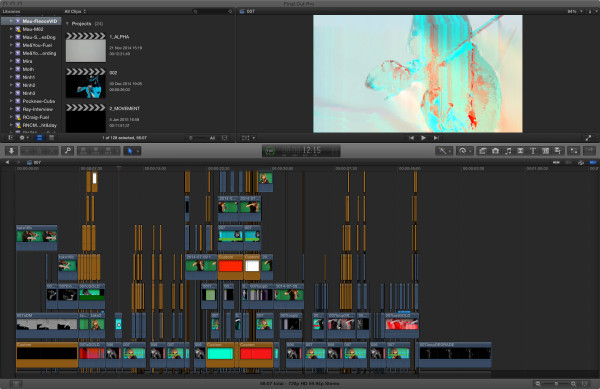
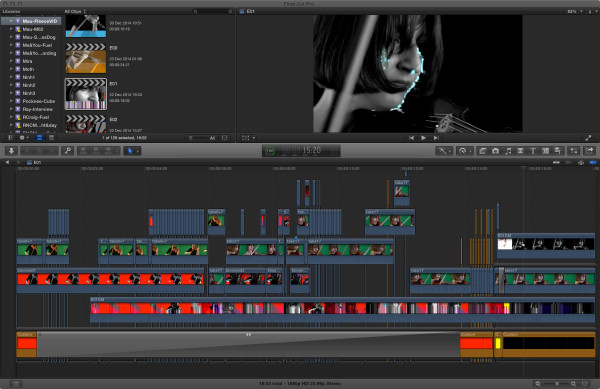 As I continued making the video for fleece, I continued researching. I came across a way to do the initial moshing I had found so tedious years earlier, using Ruby. Up until now, I hadn’t gotten around to that technique because Goldmosh was varied enough to keep things interesting.
But then I found AviGlitch – “A Ruby library to destroy your AVI files”.
Perfect! What took me minutes to do before by deleting I frames manually (and god forbid I accidentally delete the first I frame, which would crash Avidemux and I’d have to start all over!), I could do with this script in seconds. I still had to convert my file into an avi file using ffmpegX (or now in the year 2021 you can find various resources/webpages online that will change your files into avi files), and convert the avi file back to an mp4 using Handbrake, but that tedious process that datamosher teaches us about in his youtube video is now automated.
The results of doing it manually and tediously are EXACTLY the same as running this script. There are no creative decisions to be made. This is the kind of automation that grants a person freedom. It is what is good about technology. Here is the code for that kind of I frame deletion moshing, which I simply called “mosher”. Keep in mind that your file directory is going to be different from mine! Unless you are also using Rodrigo’s computer and putting your files on his desktop!
Actually, here is a folder of the ruby scrips I found most useful. Right click and download this link to save it onto your computer. It will include a short help file as well. MY DATAMOSHING RUBY SCRIPTS :)
Here’s how to use Aviglitch: Install Aviglitch: http://www.rubydoc.info/gems/aviglitch/frames
You install Aviglitch by following the instructions in the Ruby scripts folder you just downloaded.
Now what?
Export a clip from Final Cut.
The higher the resolution the better. BUT make sure you don’t export it at a resolution greater than what it was originally filmed because ffmpegX doesn’t like that and it will refuse to convert the clip (or something like that. Rather, if ffmpeg isn’t converting try exporting at different resolutions until it sticks. This is the problem 9 out of 10 times).
If you’re NOT using ffmpegX to convert your footage into avi format, then ignore THIS WHOLE ffmpegX section. Since it’s 2021 now and you can convert files to avi format online, I don’t see why anyone would use ffmpegX ever again.
—————————-ffmpeg X section
How convert it to an avi file using ffmpegX.
Make sure you have these settings (if you’re using an online converter, these next steps won’t matter to you. This is just ffmpeg stuff):
+ video codec: “XviD[.AVI] (ffmpeg)”
+ audio: un-tick “encode audio”
+ select options: “High Quality”, “Two-pass encoding”, and “Decode with QT” (but UN-tick “Letterbox”)
After you’ve exported a video clip, and converted it to avi, NOW make sure the name your avi file is “tomosh”.
THEN
open terminal on your computer and type “cd”, press space bar and then type out the file path where you’re keeping the folder with the scripts. It should look something like this. I was keeping my folder in my dropbox for example:
cd /Users/Rodrigo/Dropbox/Angie/5\ DATAMOSH/RUBYTHEN
type the name of the Ruby script you want to run.
Try “ruby mosher.rb”.
This “mosher” script slams the P frames from one clip into the I frame of the end of the previous clip. So easy! BUT keep in mind that the file directory you need to specify is going to be different……so go into the code. It needs to point to YOUR desktop (or wherever you’re keeping these).
This is what the file directory in the ruby script looks like:
/Users/Rodrigo/Desktop/moshed.avi
Change the path so it points to YOUR desktop (or wherever you’re managing your clips from). Do that before running the script or it just won’t work.
After you’ve done that, you can run the script. And you had a tomosh.avi clip on your desktop, you’ll very soon find another file called “moshed.avi” on there as well.
I also made some scripts that “bloom”. You can play around and modify the code to change how they do what they do.
“ruby bloomer.rb” is one of those blooming scripts.
It basically jumps around and blooms a frame referencing just another random point in the same clip. It does this to several frames so it’ll give you a variety of stuff you can then select the good stuff from. Run, discern, select, reimport, repeat. This is your life now. This was my process and I loved how exciting it was because of the different things it’d spit out. You can spend sooooo much time doing this, and it is time well spent.
“ruby bloomerx1.rb” is another bloom script.
This one just blooms the 5th frame of a clip, with the motion of the frame that follows it 200 times. It’s like fanning out a deck of cards.
Note: The clips used have to be at least 13 frames long.
Note 2: The eight frames that follow the 5th can be from a different sequence, not necessarily the continuation of that same clip! So it’s cool to look at sequences/frames and consider them in terms of the motion they’ll impose on an image/pixels of the 5th frame.
Note 3: This won’t work on frames 1-4, which is why it begins on the 5th frame.
Managing/naming/storing these various states of clips becomes a meditation on organization lol Good luck with all that.
—————————-
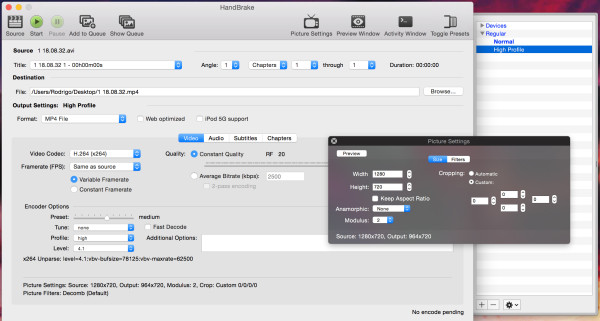
After you run these things a bunch and they make some building blocks you think you can work with, you convert these avi files back to mp4 files using Handbrake. I found Handbrake sometimes fucked up the aspect ratio during conversion. This is how you fix that….(again, knowledge gained through experimentation and discovery). Or, if you’re not too bothered, you can just transform and adjust the footage in an editing app, like Final Cut Pro X, so that you stretch the footage out. This is a little less precise but faster. So up to you.
SO IN HANDBRAKE:
+ In toggle presents make sure you have ‘High Profile’ selected
+ Then go to “Picture Settings”
+ Set anamorphic to “None”
+ Un-select “Keep Aspect Ratio”
+ Select Cropping to “Custom”
+ Change all those parameters to zero (one of these will be some other number–this is the problem!)
+ Then manually enter the width and height to match the dimensions of the original video.
So that’s how you make the building blocks–just the technical specifics. I’m going to continue to experiment with datamoshing and learn about as many different types of processes as I can.
3
WHAT FOLLOWS IS LESS TECHNICAL
Of course I made aesthetic decisions, large and small, all throughout. The thinking that took place on this video as I made it was thick muck. Each section, in addition to being personally deeply significant, also navigates the following relationships in specific ways depending on the section that’s being played:
+ the seen and the heard
+ artificial (recorded/looper) space vs real (air/performer) space
+ co-operative vs disruptive, or even destructive, sounds
+ the silent and the not
+ melody and texture
+ past and future
There is much I can say on each of these points, but I’ll just simply say that I’d invent new puzzles to solve, and try to solve those puzzles the most beautiful ways I could.
2
However, engaging in the process of making this video was different from engaging in rational, problem-solving thought. Logos. Bios. Technos. Novelty articulated via the modalities thereof. Yes, I believe in serendipity, as well as something like animism which extends itself to media. Mind in media. Life as media.
1 The Past
0.9 The stages of decay
0. 5 A small catastrophe
0.1 Shadow boxing
0 The Present
life is long and beautiful




This is wonderful… A lot of it I don’t understand, a lot could be very useful. So… thank you for taking the time to share it!
You are very welcome Stephen! And you know you can always chat me up if you want me to look at anything in particular together.